For years, detecting when an element entered the viewport meant attaching a scroll listener and calling getBoundingClientRect() on every scroll event. That approach is a performance disaster: the scroll event fires constantly, and reading layout properties inside it forces synchronous reflows, blocking the main thread and producing janky, stuttering scrolling.
The Intersection Observer API replaces all of that. You tell the browser which elements to watch and under what conditions to notify you, and it does the visibility math asynchronously, off the main thread. Your callback fires only when something actually crosses a threshold you defined. It’s the right tool for lazy loading, scroll-triggered animations, infinite scroll, scrollspy navigation, and ad/analytics visibility tracking.
Most tutorials hand you a fade-in snippet and stop. They don’t mention that threshold: 1 silently never fires on tall elements, that rootMargin rejects em units, that CSS scroll-driven animations can now replace many IO use cases without JavaScript, that content-visibility: auto composes with IO for performance, or that IntersectionObserver v2 brings trackVisibility for ad-fraud-resistant viewability tracking. This guide covers the full API, the modern CSS alternative, framework hooks for React and Vue, the sticky header sentinel pattern, SSR guards for Next.js/Astro, and the jsdom polyfill for tests.
Related tutorials: Native Lazy Loading · Responsive Images · Web Share API
Live Demo
Five interactive sections: the threshold/ratio visualizer, the rootMargin playground, scroll-reveal animations, lazy loading with unobserve, and scrollspy navigation.
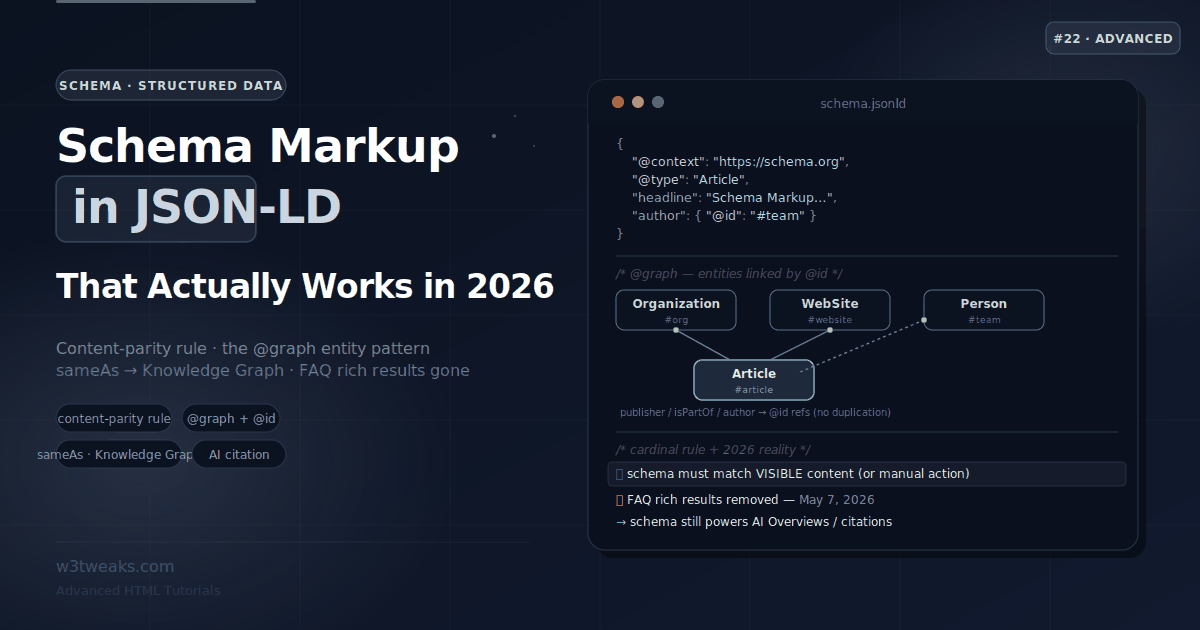
The Anatomy of an IntersectionObserver — root, rootMargin, threshold
An Intersection Observer has three parts: a callback (what to do), an options object (when to fire), and one or more observed targets.
// 1. Create the observer with a callback and options
const observer = new IntersectionObserver((entries, observer) => {
  entries.forEach(entry => {
    if (entry.isIntersecting) {
      console.log(entry.target, 'is now visible');
    }
  });
}, {
  root: null,         // null = the browser viewport
  rootMargin: '0px',  // expand/shrink the root's bounds
  threshold: 0.1      // fire when 10% of the target is visible
});

// 2. Tell it which element(s) to watch
observer.observe(document.querySelector('.box'));
The options object
| Option | What it does | Default |
|---|---|---|
root | The element used as the viewport for visibility checks. null means the browser viewport. Must be an ancestor of the targets. | null |
rootMargin | Offsets that grow (positive) or shrink (negative) the root’s bounding box before computing intersections. Only px or %. | '0px' |
threshold | A number, or array of numbers, from 0 to 1 — the visibility ratio(s) at which the callback fires. | 0 |
scrollMargin | (2025) Margin applied to nested scroll containers within the root. | '0px' |
The IntersectionObserverEntry
Each time the callback fires, it receives an array of entries — one per target whose intersection changed:
entry.isIntersecting     // boolean — is it crossing the threshold right now?
entry.intersectionRatio  // 0 to 1 — what fraction of the target is visible
entry.target             // the observed Element (use this to identify which fired)
entry.boundingClientRect // the target's rectangle
entry.intersectionRect   // the visible portion's rectangle
entry.rootBounds         // the root's rectangle (after rootMargin)
entry.time               // timestamp of the intersection
// IntersectionObserver v2 only — see "Ad viewability" below
entry.isVisible          // pixels actually painted (not occluded/transformed/filtered)
entry.target is what lets you share one observer across many elements.
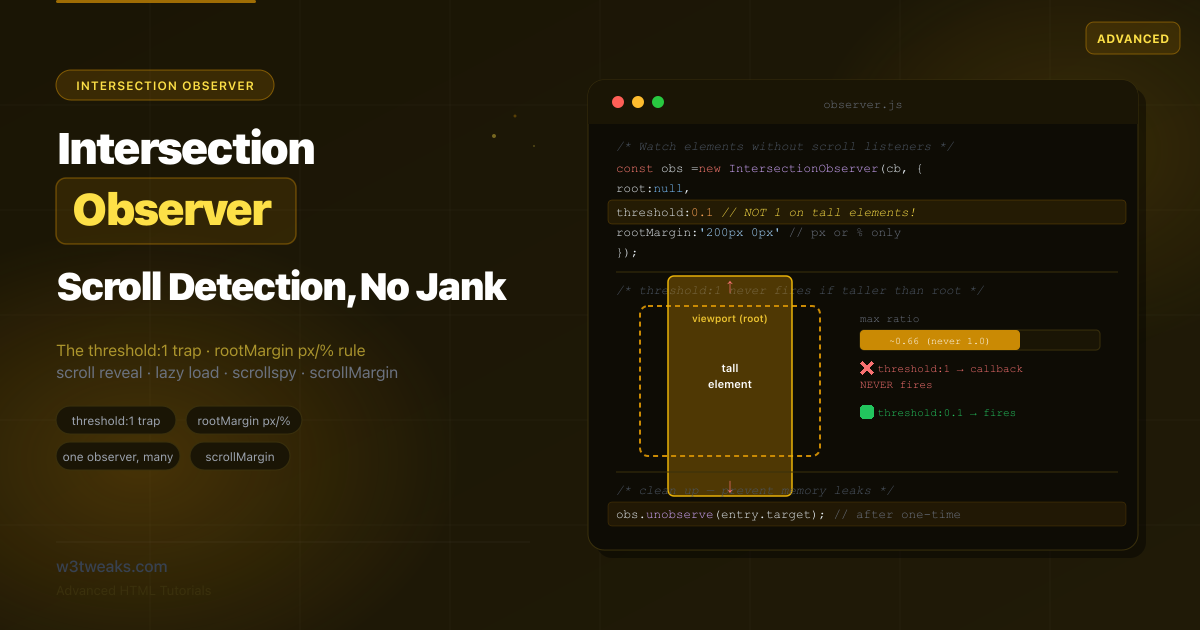
IntersectionObserver threshold — And the threshold:1 Trap
threshold defines how much of the target must be visible before the callback fires. A single number is one trigger point; an array gives you multiple.
threshold: 0      // fire as soon as 1 pixel is visible (default)
threshold: 0.5    // fire when 50% is visible
threshold: 1.0    // fire when 100% is visible
threshold: [0, 0.25, 0.5, 0.75, 1]  // fire at each of these ratios
The trap: threshold: 1 on a tall element never fires
This is the single most common Intersection Observer bug. If your target element is taller than the viewport (or the root), it can never be 100% visible at once — so threshold: 1 means your callback never fires.
// ❌ A full-height section with threshold:1 — callback NEVER runs
const observer = new IntersectionObserver(callback, { threshold: 1.0 });
observer.observe(document.querySelector('.full-height-section'));

// ✅ Use a low threshold for tall elements
const observer = new IntersectionObserver(callback, { threshold: 0.1 });
The fix is to use a low threshold (0.1 or 0.2) for any element that might be taller than the viewport, or to use a threshold array and respond to intersectionRatio instead of waiting for full visibility.
isIntersecting vs intersectionRatio
Boolean gate vs a 0–1 number for proportional effects. Use isIntersecting for on/off triggers and intersectionRatio for fades and animations driven by visibility:
const observer = new IntersectionObserver((entries) => {
  entries.forEach(entry => {
    // Fade in proportionally to how visible the element is
    entry.target.style.opacity = entry.intersectionRatio;
  });
}, {
  threshold: [0, 0.1, 0.2, 0.3, 0.4, 0.5, 0.6, 0.7, 0.8, 0.9, 1]
});
IntersectionObserver rootMargin — The px/% Rule and Pre-loading
rootMargin grows or shrinks the root’s bounding box before intersections are computed. Its syntax mirrors CSS margin, but with one strict rule most tutorials omit.
Only px and % are allowed
// ✅ Pixels
rootMargin: '200px'
rootMargin: '100px 0px'          // top/bottom 100px, left/right 0
rootMargin: '0px 0px -50px 0px'  // negative bottom shrinks the box

// ✅ Percentages (relative to the ROOT, not the target)
rootMargin: '25%'

// ❌ These throw a SyntaxError — em, rem, vh, etc. are NOT allowed
rootMargin: '10em'   // ✗ invalid
rootMargin: '5vh'    // ✗ invalid
Positive margins pre-load earlier
// Start loading 300px before the element enters the viewport
const observer = new IntersectionObserver(loadCallback, {
  rootMargin: '300px 0px'  // grows top & bottom by 300px
});
Negative margins fire when deeper in view
// Only "active" when the section is in the middle 40% of the viewport
const observer = new IntersectionObserver(spyCallback, {
  rootMargin: '-30% 0px -30% 0px'  // shrinks top & bottom by 30%
});
rootMargin only applies when the root actually clips the target (the root is a scrolling ancestor or the viewport). Without a clipping ancestor, the margin has no effect.
Pattern 1: Scroll Reveal JavaScript (with One Observer)
A minimal Intersection Observer example that reveals elements as they scroll into view. The key is to unobserve after revealing so the animation runs once and the observer stops doing work.
<div class="reveal">Section one</div>
<div class="reveal">Section two</div>
<div class="reveal">Section three</div>
.reveal {
opacity: 0;
transform: translateY(30px);
transition: opacity 0.6s ease, transform 0.6s ease;
}
.reveal.visible {
opacity: 1;
transform: translateY(0);
}
@media (prefers-reduced-motion: reduce) {
.reveal { transition: none; }
}// ONE observer for ALL .reveal elements
const revealObserver = new IntersectionObserver((entries, observer) => {
entries.forEach(entry => {
if (entry.isIntersecting) {
entry.target.classList.add('visible');
observer.unobserve(entry.target); // ✅ one-time: stop watching
}
});
}, {
threshold: 0.15,
rootMargin: '0px 0px -50px 0px'
});
document.querySelectorAll('.reveal').forEach(el => revealObserver.observe(el));Note @media (prefers-reduced-motion) — respect users who’ve asked for less motion.
When You Don’t Need IntersectionObserver At All — CSS Scroll-Driven Animations
Baseline late 2024. animation-timeline: view() lets you drive a CSS animation from how far an element has scrolled into the viewport — no JavaScript, no observer, no cleanup. For declarative reveal animations, this is now the right answer:
.reveal {
  animation: fade-in linear both;
  animation-timeline: view();
  animation-range: entry 0% entry 50%;
}

@keyframes fade-in {
  from { opacity: 0; transform: translateY(30px); }
  to   { opacity: 1; transform: none; }
}

@media (prefers-reduced-motion: reduce) {
  .reveal {
    animation: none;
    opacity: 1;
    transform: none;
  }
}

@supports not (animation-timeline: view()) {
  /* Progressive enhancement fallback to IO */
  .reveal { opacity: 0; transform: translateY(30px); }
  .reveal.visible { opacity: 1; transform: translateY(0); transition: opacity .6s, transform .6s; }
}
CSS scroll-driven animations vs IntersectionObserver — which to use
| Use case | Pure CSS (animation-timeline) | IntersectionObserver |
|---|---|---|
| Fade/slide in once | ✅ best fit | overkill |
| Tied to scroll progress | ✅ best fit | possible with threshold array |
| Lazy load images | ❌ | ✅ |
| Infinite scroll | ❌ | ✅ |
| Analytics impression | ❌ | ✅ |
| State change in JS | ❌ | ✅ |
| Trigger a network request | ❌ | ✅ |
Rule of thumb: CSS for declarative reveals; IntersectionObserver when you need state changes, analytics, lazy network requests, or anything non-animation.
content-visibility: auto vs IntersectionObserver
Both ship as “visibility performance” wins; devs conflate them. They actually compose:
content-visibility: auto | IntersectionObserver | |
|---|---|---|
| Who runs it | Browser, declarative | You, callback-based |
| What it does | Skips rendering off-screen elements | Fires your JS when visibility crosses a threshold |
| JS overhead | Zero | Small (callback) |
| Accessibility tree | Hidden when fully off-screen | Unchanged |
| Best for | Long lists, virtualized feeds | Lazy load, analytics, animations |
Use content-visibility: auto on long lists or feeds for free rendering wins, and IntersectionObserver for your own logic. They compose cleanly:
/* Browser skips rendering off-screen list items */
.feed-item {
  content-visibility: auto;
  contain-intrinsic-size: 0 200px; /* placeholder size avoids scroll jumps */
}
// Plus IO for lazy-loading network data
const lazyObs = new IntersectionObserver(loadCallback, { rootMargin: '400px' });
document.querySelectorAll('.feed-item').forEach(el => lazyObs.observe(el));Pattern 2: Lazy Load Images JavaScript
Defer image loading until they’re near the viewport. With native loading="lazy" available, you’d reach for Intersection Observer here only when you need a custom distance threshold or a fade-in effect:
<img data-src="photo-1.jpg" alt="Photo 1" class="lazy" width="800" height="600">
<img data-src="photo-2.jpg" alt="Photo 2" class="lazy" width="800" height="600">
const lazyObserver = new IntersectionObserver((entries, observer) => {
entries.forEach(entry => {
if (!entry.isIntersecting) return;
const img = entry.target;
img.src = img.dataset.src;
if (img.dataset.srcset) img.srcset = img.dataset.srcset;
img.removeAttribute('data-src');
img.classList.add('loaded');
observer.unobserve(img);
});
}, {
rootMargin: '200px 0px' // start loading 200px before it scrolls in
});
document.querySelectorAll('img.lazy').forEach(img => lazyObserver.observe(img));The rootMargin: '200px' is what gives IO an edge over native lazy loading: you control exactly how far ahead loading begins. See the native lazy loading tutorial for when to prefer the built-in attribute.
Pattern 3: Infinite Scroll IntersectionObserver
Place a sentinel element at the bottom of your list. When it scrolls into view, load the next page. Unlike one-time patterns, here you keep observing the sentinel:
<ul id="feed"><!-- items --></ul>
<div id="sentinel" aria-hidden="true"></div>
let page = 1;
let loading = false;
const sentinelObserver = new IntersectionObserver(async (entries) => {
const sentinel = entries[0];
if (!sentinel.isIntersecting || loading) return;
loading = true;
const items = await fetchPage(page++);
appendItems(items);
loading = false;
if (items.length === 0) {
sentinelObserver.unobserve(document.getElementById('sentinel'));
}
}, {
rootMargin: '400px 0px'
});
sentinelObserver.observe(document.getElementById('sentinel'));The loading flag prevents duplicate fetches if the callback fires multiple times before the request completes.
Pattern 4: Scrollspy JavaScript
Highlight the nav link for whichever section is currently in view. This uses a negative rootMargin to define an “active zone” in the middle of the viewport:
const tocLinks = document.querySelectorAll('.toc-link');
const sections = document.querySelectorAll('section[id]');

const spyObserver = new IntersectionObserver((entries) => {
  entries.forEach(entry => {
    if (!entry.isIntersecting) return;

    const id = entry.target.id;
    tocLinks.forEach(link => {
      link.classList.toggle('active', link.getAttribute('href') === `#${id}`);
    });
  });
}, {
  rootMargin: '-40% 0px -40% 0px',  // middle 20% of viewport
  threshold: 0
});

sections.forEach(section => spyObserver.observe(section));
Sticky Header Sentinel Pattern
Iconic IO pattern that’s rarely covered. To detect when a position: sticky header has actually “stuck” — so you can add a shadow or background change — place a tiny sentinel above the header and observe it:
<div id="sticky-sentinel" aria-hidden="true" style="height:1px"></div>
<header class="site-header" id="header">…</header>
const sentinel = document.getElementById('sticky-sentinel');
const header = document.getElementById('header');
const stickyObserver = new IntersectionObserver(([entry]) => {
// When the sentinel scrolls OUT of view, the header is now stuck
header.classList.toggle('is-stuck', !entry.isIntersecting);
}, {
rootMargin: '-1px 0px 0px 0px' // catches the moment it just leaves
});
stickyObserver.observe(sentinel);.site-header {
position: sticky;
top: 0;
transition: box-shadow 0.2s, background 0.2s;
}
.site-header.is-stuck {
box-shadow: 0 2px 10px rgba(0, 0, 0, 0.1);
background: white;
}You can also do this with CSS animation-timeline: scroll() and no JavaScript — but the sentinel pattern remains the most reliable cross-browser option.
The One-Observer-Many-Elements Pattern
A scalability point most tutorials get wrong: you do not create one observer per element. One observer can watch hundreds of elements:
// ❌ Wasteful: one observer per element
document.querySelectorAll('.item').forEach(el => {
  const obs = new IntersectionObserver(callback); // 100 elements = 100 observers
  obs.observe(el);
});

// ✅ Efficient: one observer, many targets
const observer = new IntersectionObserver((entries) => {
  entries.forEach(entry => {
    if (entry.isIntersecting) {
      handleVisible(entry.target);
    }
  });
});
document.querySelectorAll('.item').forEach(el => observer.observe(el));
Create one observer per unique combination of root, rootMargin, and threshold. Elements that share those options share an observer.
Cleanup — unobserve() vs disconnect()
The most common Intersection Observer mistake is never cleaning up:
| Method | Effect | Use when |
|---|---|---|
unobserve(el) | Stops watching one element; observer stays alive for the rest | After a one-time event on a single element (reveal, lazy load) |
disconnect() | Stops watching everything; observer can be garbage-collected | Component unmounts, page teardown |
// React example
useEffect(() => {
  const observer = new IntersectionObserver(callback, options);
  elements.forEach(el => observer.observe(el));
  return () => observer.disconnect();
}, []);
IntersectionObserver v2 — trackVisibility for Ad Viewability
Standard IO tells you if pixels should be visible based on geometry. IntersectionObserver v2 tells you if pixels were actually painted, not occluded by another element, not behind a transform/filter, not on a hidden tab. This is essential for ad-viewability tracking and fraud-resistant impression analytics.
const adObs = new IntersectionObserver(callback, {
  threshold: 0.5,
  trackVisibility: true,
  delay: 100  // REQUIRED — minimum 100ms or constructor throws
});

adObs.observe(adElement);

function callback(entries) {
  entries.forEach(entry => {
    if (entry.isVisible) {  // v2-only — true only if actually painted
      sendImpression(entry.target.dataset.adId);
    }
  });
}
Caveats: Chrome and Edge only (Safari and Firefox haven’t shipped). trackVisibility is expensive — that’s why delay is mandatory. Use it for impression tracking, not animations.
IntersectionObserver in React (useInView) and Vue (useIntersectionObserver)
React — react-intersection-observer
npm install react-intersection-observerimport { useInView } from 'react-intersection-observer';
function LazyImage({ src }) {
const { ref, inView } = useInView({
threshold: 0,
rootMargin: '200px',
triggerOnce: true,
});
return (
<img
ref={ref}
src={inView ? src : ''}
alt=""
width="800"
height="600"
/>
);
}Footgun: the ref must attach to a DOM node. If you pass it to a child component without forwardRef, the observer never gets a real element. Always check the ref is connected.
Vue — VueUse
npm install @vueuse/core<script setup>
import { ref } from 'vue';
import { useIntersectionObserver } from '@vueuse/core';
const target = ref(null);
const isVisible = ref(false);
useIntersectionObserver(target, ([{ isIntersecting }]) => {
if (isIntersecting) isVisible.value = true;
});
</script>
<template>
<div ref="target">{{ isVisible ? 'Visible!' : 'Hidden' }}</div>
</template>VueUse handles the cleanup automatically when the component unmounts — no manual disconnect() needed.
Frameworks and Tests — SSR Guards and the jsdom Polyfill
Next.js / Astro SSR Guard
Server-side rendering doesn’t have IntersectionObserver. Module-scope calls crash the build:
// ❌ Crashes: IntersectionObserver is not defined
const observer = new IntersectionObserver(callback);

// ✅ Inside useEffect — runs client-side only
useEffect(() => {
  const observer = new IntersectionObserver(callback, options);
  observer.observe(ref.current);
  return () => observer.disconnect();
}, []);

// Or dynamic import with ssr: false (Next.js)
const LazyComponent = dynamic(() => import('./LazyComponent'), { ssr: false });
Astro: prefer the client:visible directive — it’s literally IntersectionObserver under the hood. The component hydrates only when it scrolls into view:
---
import HeavyChart from '../components/HeavyChart.astro';
---
<HeavyChart client:visible />
Jest / Vitest / jsdom polyfill
jsdom doesn’t implement IntersectionObserver. Two options:
// Option 1: install the polyfill in setup
// npm install -D intersection-observer
import 'intersection-observer';
// Option 2: stub it in vitest.setup.ts
import { vi } from 'vitest';
vi.stubGlobal('IntersectionObserver', class {
observe() {}
unobserve() {}
disconnect() {}
});The polyfill is the right answer if your tests verify observer behavior; the stub is enough if you only need the constructor not to throw.
Observer Family — Which to Use When
The browser ships four major observers — each watches a different thing:
| API | Observes | Callback fires when | Typical use |
|---|---|---|---|
| IntersectionObserver | Viewport overlap | Visibility ratio crosses a threshold | Lazy load, scroll reveal, scrollspy |
| ResizeObserver | Element box size | border-box / content-box changes size | Responsive components, container queries fallback |
| MutationObserver | DOM tree / attributes | Children added/removed, attribute changes | Watching third-party widgets, debug tooling |
| PerformanceObserver | Performance entries | New entries (LCP, CLS, longtasks) | Web Vitals reporting, RUM |
They’re cheap and independent — observe the same element with multiple observers when you need size + visibility together.
Lesser-Known IO Methods
// Read back the options for debugging
observer.root;        // the configured root element (or null)
observer.rootMargin;  // the normalized rootMargin string
observer.thresholds;  // array of thresholds (always an array, even for one)

// Get pending entries and clear the queue
const pending = observer.takeRecords();
observer.disconnect();
// Use `pending` to capture final visibility state before disconnecting
Element.checkVisibility() — Synchronous One-Off Check
When you just need a yes/no answer right now without setting up an observer, Element.checkVisibility() (Chrome 105+, Safari 17.4+, Firefox 125+) returns a synchronous boolean:
const isVisible = element.checkVisibility({
  checkOpacity: true,        // false if any ancestor has opacity:0
  checkVisibilityCSS: true,  // false if visibility:hidden anywhere
});

if (isVisible) {
  trackEvent('component-rendered-and-visible');
}
No observer, no callback, no cleanup — just a one-shot check. Use it for testing and analytics; use IO when you need to react to visibility changes over time.
The New scrollMargin Option (2025)
A recent addition: scrollMargin adds a margin to nested scroll containers within the root, not just the root itself.
// Lazy-load carousel items 100px before they scroll into the carousel's view
const carouselObserver = new IntersectionObserver(loadItem, {
  root: document.querySelector('.carousel'),
  scrollMargin: '0px 100px'  // horizontal margin on the nested scroller
});
rootMargin adjusts only the root’s own clipping box; scrollMargin adjusts the clipping boxes of intermediate scroll containers between the root and the target. Treat as progressive enhancement for older browsers.
Key Takeaways
- The Intersection Observer API detects element visibility asynchronously, off the main thread — replacing the
scroll + getBoundingClientRect()pattern that causes layout thrashing - An observer has three parts: a callback, an options object (
root,rootMargin,threshold), and observed targets registered withobserve() threshold: 1never fires on an element taller than the viewport — use 0.1 or a threshold array withintersectionRatiofor tall sectionsrootMarginaccepts onlypxand%— other units throw a SyntaxError; positive grows the box (pre-load), negative shrinks it (scrollspy)- Use
isIntersectingfor on/off triggers andintersectionRatiofor proportional effects driven by a threshold array - Share ONE observer across many elements that have the same options — use
entry.targetin the callback to identify which fired - Call
unobserve(element)after one-time events; calldisconnect()to tear down on component unmount or page teardown - CSS
animation-timeline: view()(Baseline late 2024) replaces many IO scroll-reveal use cases entirely — use CSS for declarative animations, IO for state changes / analytics / network requests content-visibility: autocomposes with IO — let the browser skip rendering off-screen content while IO drives your callbacks- IntersectionObserver v2 (
trackVisibility: true, delay: 100) verifies pixels were actually painted — for ad viewability and fraud-resistant analytics. Chrome/Edge only - The sticky header sentinel pattern — observe a 1px sentinel above your sticky header to detect when it sticks
- React:
useInViewfromreact-intersection-observer(ref must attach to a DOM node). Vue:useIntersectionObserverfrom VueUse (auto-cleanup) - Astro:
client:visibledirective IS IntersectionObserver under the hood — use it for lazy hydration - Tests: jsdom doesn’t implement IO. Install
intersection-observerpolyfill or stub withvi.stubGlobal - The browser ships 4 major observers — IntersectionObserver (visibility), ResizeObserver (size), MutationObserver (DOM), PerformanceObserver (perf). Compose them
observer.takeRecords()flushes pending entries beforedisconnect()— useful for capturing final state.Element.checkVisibility()is the synchronous one-off alternative when you don’t need to react to changes
FAQ
Why doesn’t my Intersection Observer callback fire?
The most common cause is threshold: 1 on an element taller than the viewport — it can never be 100% visible, so the callback never fires. Use a lower threshold like 0.1 or 0.2. Other causes: the target isn’t a descendant of the specified root; the element is display: none (it has no box to intersect); or you set rootMargin with an invalid unit (only px and % are allowed) which throws on construction.
What is the difference between isIntersecting and intersectionRatio?
isIntersecting is a boolean — true when the target is crossing the threshold you set, false when it isn’t. Use it for on/off decisions like “reveal this element” or “load this image.” intersectionRatio is a number from 0 to 1 representing what fraction of the target is currently visible. Use it for proportional effects — for example, setting opacity equal to the ratio. To get meaningful ratio values, pass a threshold array like [0, 0.25, 0.5, 0.75, 1].
How do I make Intersection Observer trigger before an element is visible?
Use a positive rootMargin. It grows the root’s bounding box outward, so the callback fires before the element actually enters the viewport. For example, rootMargin: '300px 0px' triggers when the element is still 300px below the fold — perfect for pre-loading. rootMargin only accepts px and % units; anything else throws a SyntaxError.
Should I create a separate observer for each element?
No. One Intersection Observer can watch many elements efficiently. Create a single observer for each unique combination of root, rootMargin, and threshold, then call observe() for every element that shares those options. In the callback, use entry.target to identify which element triggered. Creating one observer per element doesn’t scale on long pages.
How do I prevent memory leaks with Intersection Observer?
For one-time events like scroll reveals or lazy loading, call observer.unobserve(entry.target) inside the callback once you’ve handled the element. For complete teardown when a component unmounts, call observer.disconnect() to stop watching all targets. An observer stays alive as long as it has script references or is observing targets, so in single-page apps disconnect on unmount.
What is scrollMargin in Intersection Observer?
scrollMargin is a 2025 option that adds a margin to nested scroll containers within the root, not just the root’s own clipping box like rootMargin does. It’s useful when you lazy-load content inside an inner scrollable element — such as a horizontal carousel — where rootMargin alone can’t reach the intermediate clipping rectangle.
Should I use CSS scroll-driven animations or IntersectionObserver?
For pure animations triggered by scroll position (fade in, slide in, parallax-style scroll effects), prefer CSS animation-timeline: view() — it’s Baseline late 2024, declarative, runs on the compositor, and needs no cleanup. Reach for IntersectionObserver when you need a state change in JavaScript — loading an image, fetching a page of data, tracking an analytics impression, hydrating a component, or anything else that isn’t just animating CSS. Both can coexist: animate with CSS, observe with JS for everything else.
How do I use IntersectionObserver in React or Next.js?
In React, use the react-intersection-observer library’s useInView hook: const { ref, inView } = useInView({ threshold: 0, triggerOnce: true }) — attach ref to the element you want to observe. The footgun: ref must attach to a DOM node, not a custom component without forwardRef. For Next.js, useInView already runs client-side via useEffect, but if you instantiate IntersectionObserver at module scope, guard with typeof window !== 'undefined' or wrap with dynamic(() => ..., { ssr: false }). For tests, install the intersection-observer polyfill in your jsdom setup file.
What is the difference between IntersectionObserver and MutationObserver?
They observe different things. IntersectionObserver watches viewport overlap — its callback fires when an element’s visibility crosses a threshold. Use it for lazy loading, scroll reveals, scrollspy. MutationObserver watches DOM changes — its callback fires when children are added/removed or attributes change. Use it to react to third-party widgets that inject elements, or to debug DOM tools. They’re both part of the observer family (alongside ResizeObserver for size changes and PerformanceObserver for perf entries) and compose cleanly when you need to watch multiple things on the same element.