JavaScript
22 min
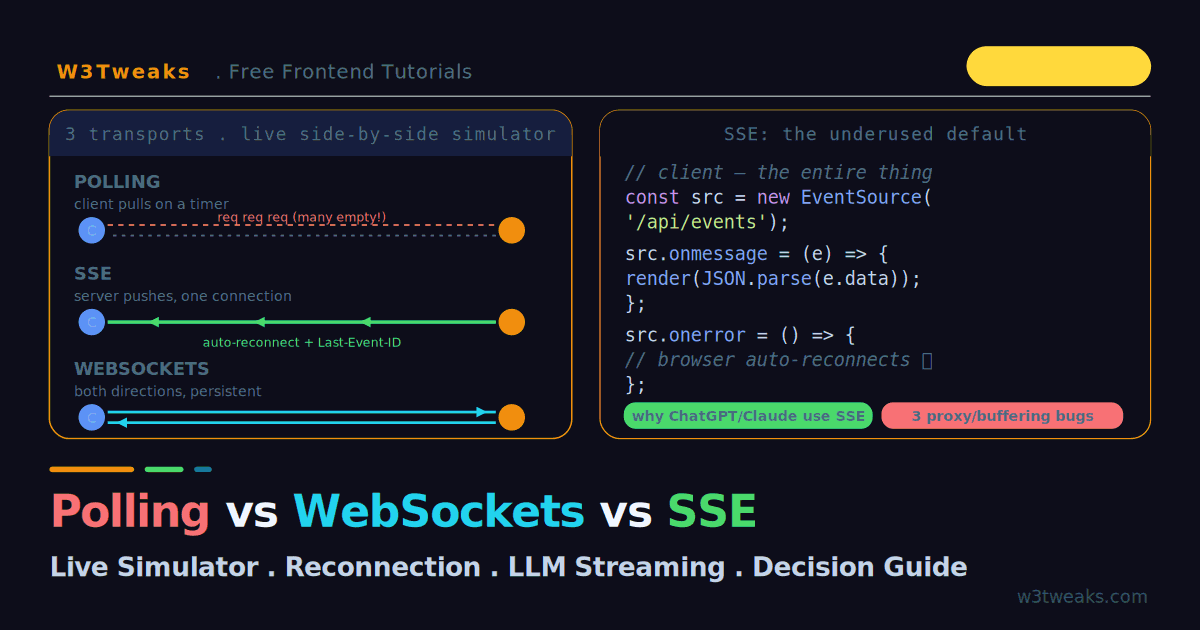
Polling vs WebSockets vs SSE: The Real-Time Guide
Everyone defaults to WebSockets for real-time. Most shouldn't. This guide runs polling, WebSockets, and Server-Sent Events in a live side-by-side simulator so you can see polling waste requests, SSE stream over one HTTP connection, and WebSockets talk both ways. Plus Node.js ws server code, socket.io vs raw WS, LLM streaming with Fetch + ReadableStream, WebSocket authentication, serverless timeout limits (Vercel, Netlify, Cloudflare Workers), pub/sub scaling with Redis, jittered reconnection backoff, and the production bugs — proxy buffering, HTTP/1.1 six-connection limit, silent WebSocket death — that bite every team.
JavaScript
19 min
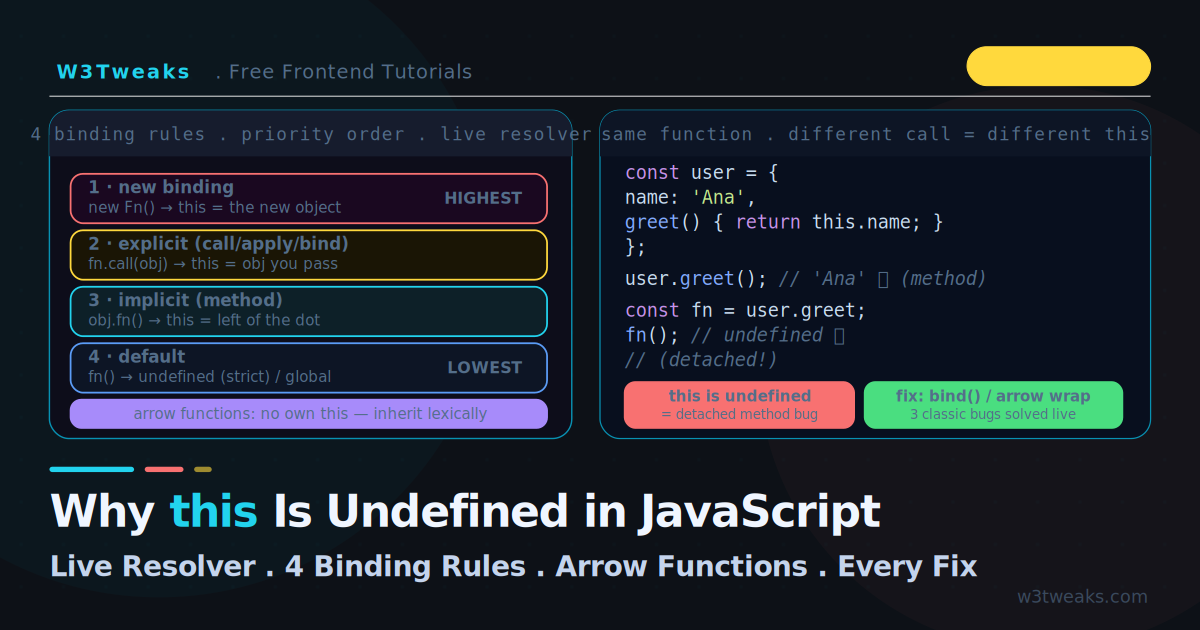
Why this Is Undefined in JavaScript: The 4 Binding Rules
this is undefined is the most-Googled JavaScript bug for a reason: this is decided by HOW a function is called, not where it's defined. This guide has a live resolver — pick a call site and watch this walk the four binding rules in priority order to its final value. Plus the same function getting six different this values, three classic context-loss bugs, ES module quirks, globalThis, event handlers, forEach thisArg, destructured methods, and TypeScript this parameters.
JavaScript
24 min
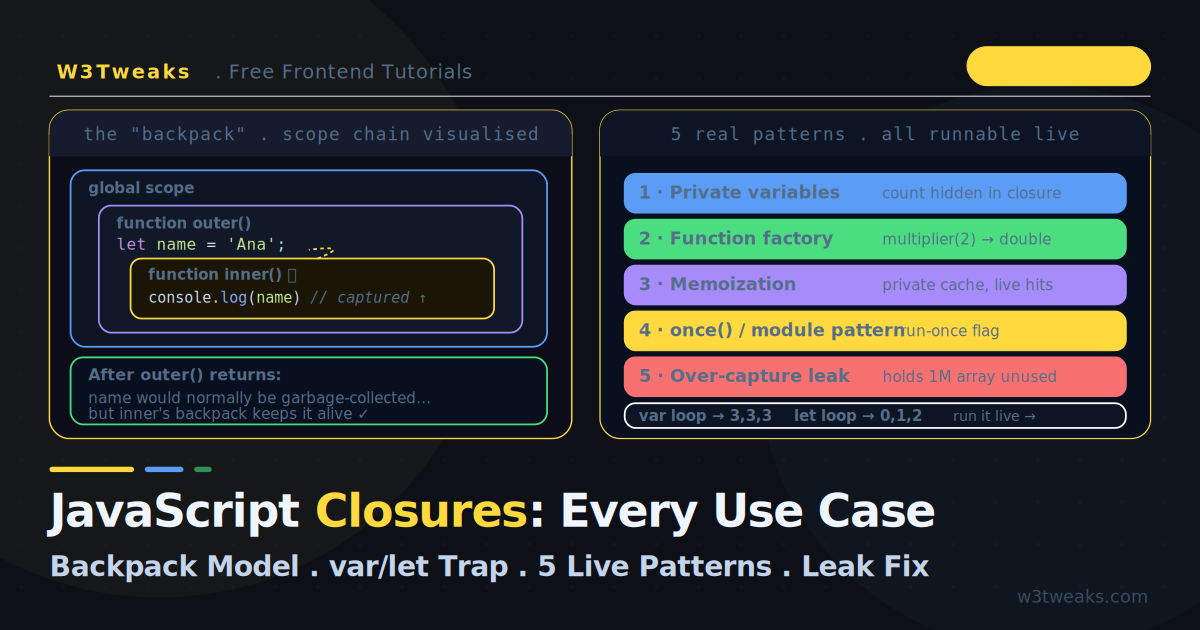
JavaScript Closures: Every Use Case Explained (Live Demos)
Every closures tutorial gives you the same one-line definition and a counter example. This one has live demos — watch a closure's 'backpack' keep variables alive after the outer function returns, run the var-vs-let-vs-IIFE loop trap, and execute five real patterns. Plus what most tutorials skip: #private class fields as the modern alternative, WeakMap memoization for object keys, stale closures in async setInterval (not just React), the interview-question toolkit (debounce + curry + compose), and WeakRef + Symbol.dispose for closure cleanup.
JavaScript
21 min
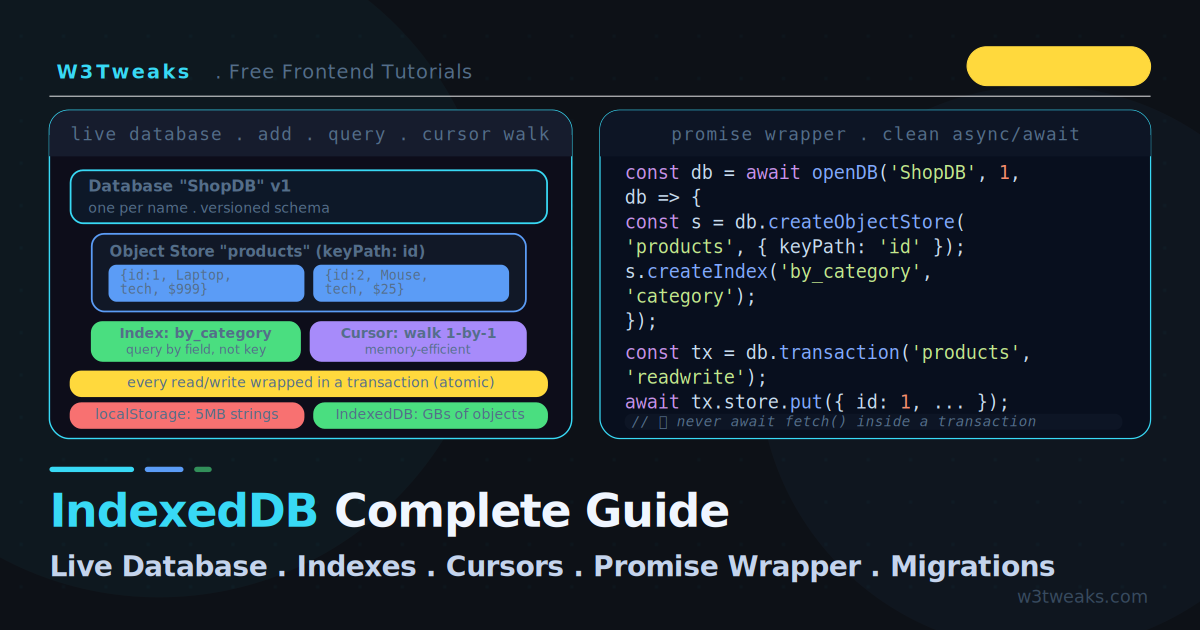
IndexedDB Tutorial: idb, Cursors, Bulk Insert & Sync
Most IndexedDB tutorials stop at hello-world and never cover what makes the difference in production: the idb library by Jake Archibald, bulk insert performance (1 transaction vs many is ~100x faster), cross-tab sync with BroadcastChannel, the Service Worker offline-first pattern, storing Files and Blobs for offline upload queues, the transaction auto-close bug that silently breaks data in Safari and Firefox, compound indexes, Dexie/RxDB/PouchDB decision, and full TypeScript typing. With a live IndexedDB playground.
JavaScript
21 min
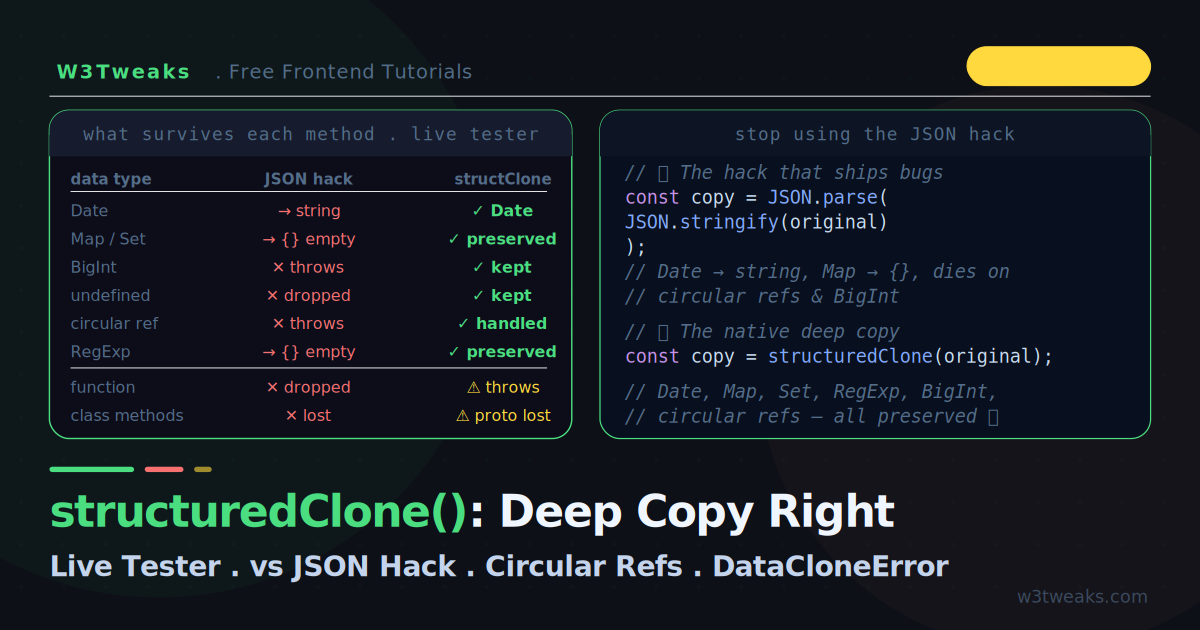
structuredClone: JavaScript Deep Copy (Stop JSON.parse)
Most deep-copy guides stop at structuredClone vs JSON. This update covers what every competitor skips: the structuredClone is not defined polyfill for Node 16 / Jest / jsdom, Symbol-keyed properties silently dropped, property descriptors collapsing to plain values, why Immer or Mutative is the right choice for React state (NOT structuredClone), ES2023 non-mutating array methods that replace most clone calls, concrete 1KB/100KB/1MB benchmarks, and WinterCG runtime parity across Node, Bun, Deno, and Cloudflare Workers.
JavaScript
20 min
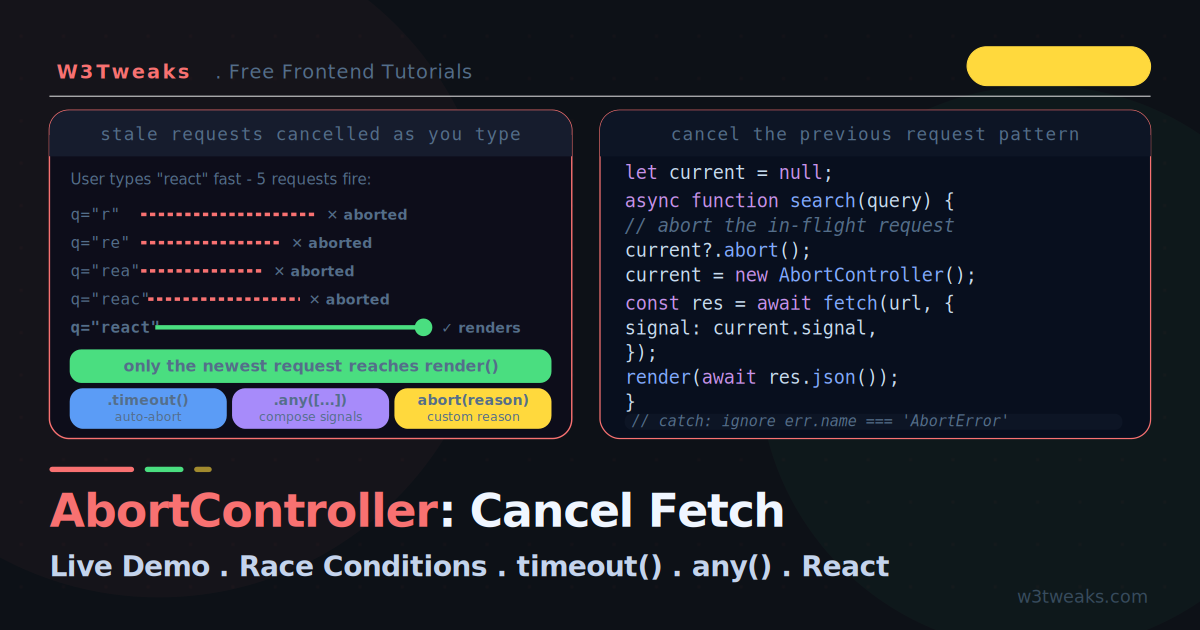
AbortController: Cancel Fetch Properly (With Live Demo)
How to cancel a fetch request properly — with a live search-race demo. Type fast and watch stale requests get cancelled in real time. Covers AbortController vs AbortSignal, debounce+abort for autocomplete, AbortSignal.timeout() one-liners, AbortSignal.any() composition, AbortSignal.throwIfAborted(), React useEffect cleanup, the single-use trap, custom abort reasons, memory leaks with abort listeners, and the libraries (TanStack Query, SWR, Axios, ky) that handle signals automatically.
JavaScript
21 min
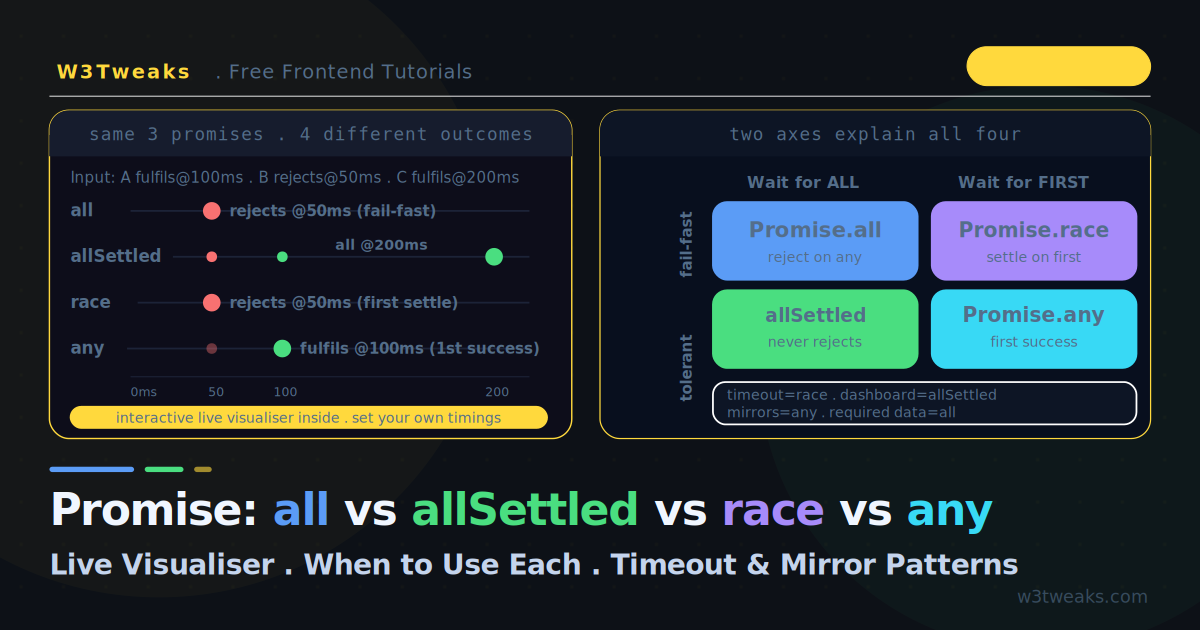
Promise.all vs allSettled vs race vs any: Complete Guide
Promise.all vs allSettled vs race vs any explained with a live visualiser. Set four promise durations and outcomes, then watch all four methods settle differently in real time. Plus the patterns competitors skip: AbortSignal.timeout + AbortSignal.any for modern timeouts, concurrency pools to cap parallel requests, TypeScript narrowing for allSettled, Promise.withResolvers and Promise.try, the unhandled-rejection traps, and the await-Promise.all vs serial-await interview question answered.
JavaScript
24 min
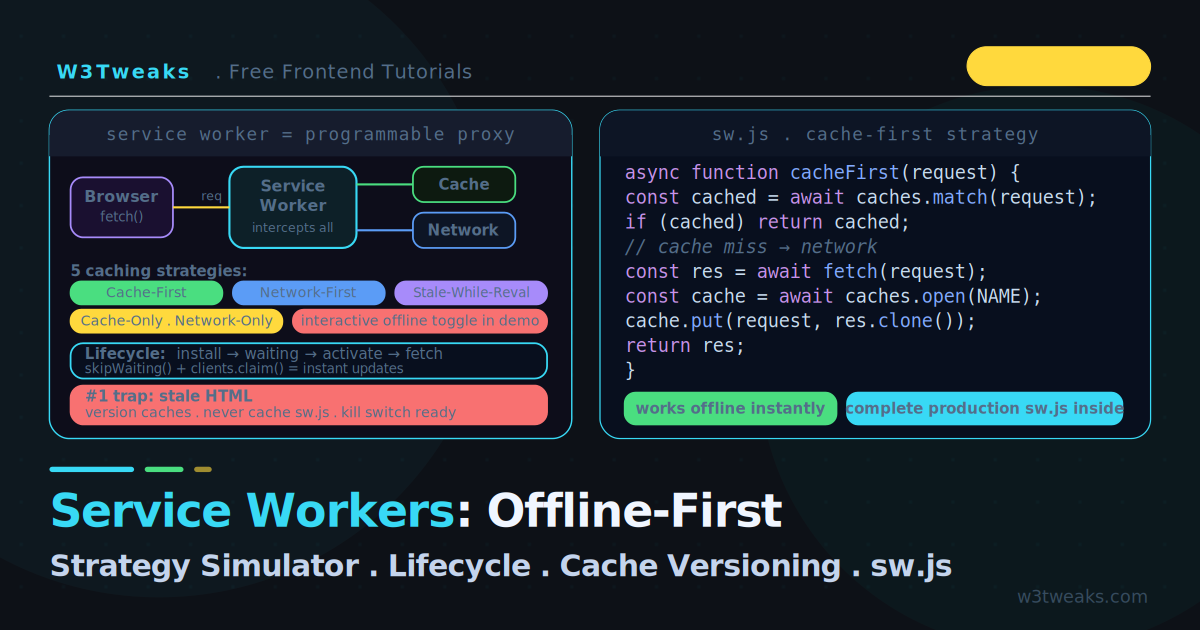
Service Worker Offline First: Complete Tutorial With Simulator
This service worker offline first tutorial has an interactive simulator — pick a strategy, toggle offline, click Clear Cache, and watch cache-first / network-first / stale-while-revalidate behave live. Then handle the waiting trap with a New Version Available banner, queue offline POST writes with Background Sync, fix cache.addAll() atomicity, enable Navigation Preload for ~300ms cold-start savings, and work around iOS Safari quirks.
JavaScript
23 min
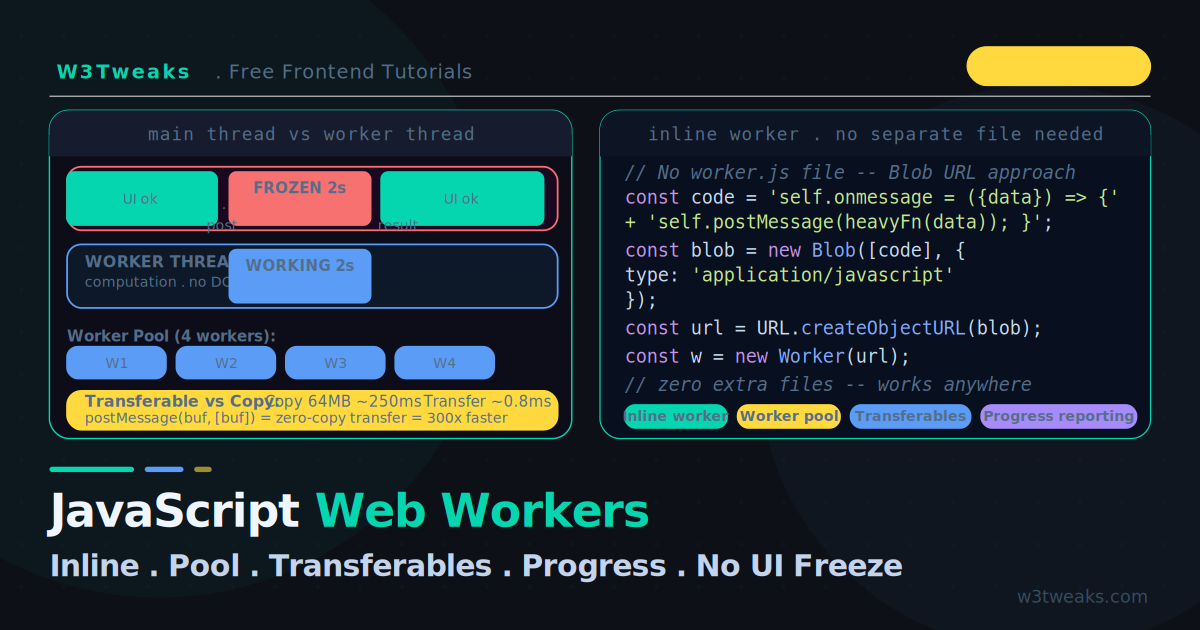
JavaScript Web Workers: Keep the UI Smooth While Running Heavy Code
Web Worker tutorials always need a separate worker.js file and a build tool. This one doesn't. Learn inline workers with Blob URLs (no separate file), a worker pool you build from scratch, transferable objects benchmark showing 100-300× speed difference, Comlink for ergonomic worker APIs, OffscreenCanvas for jank-free animations, SharedArrayBuffer + Atomics with the COOP/COEP headers you need, the structured clone gotchas, modern Vite/React syntax, and the exact threshold when workers hurt instead of help.
JavaScript
23 min
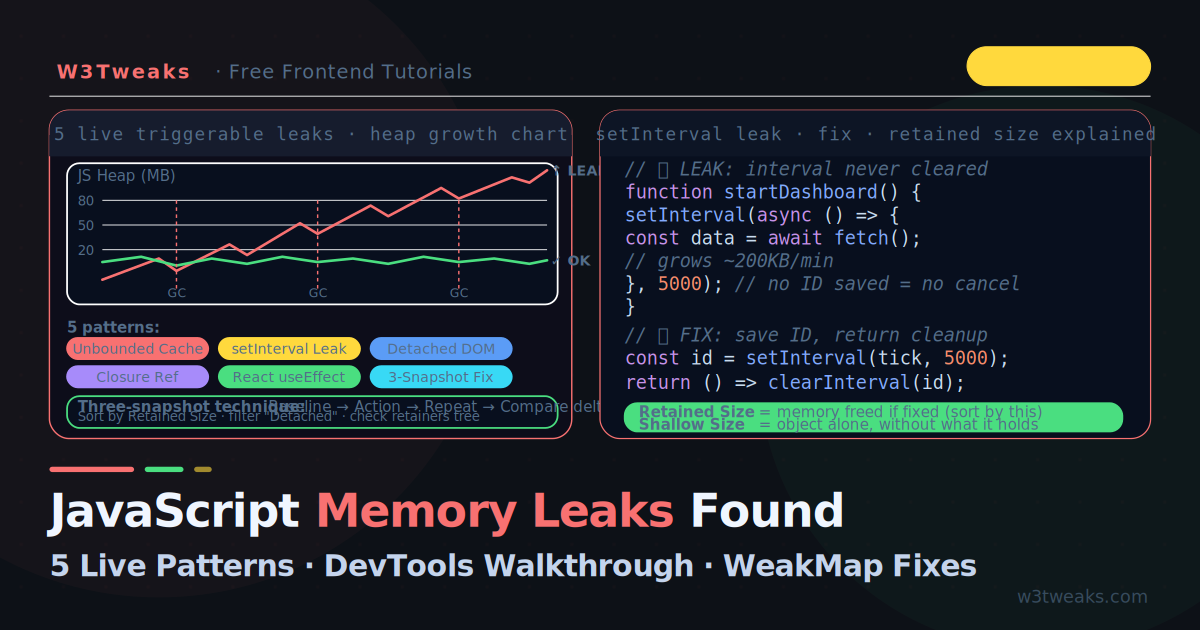
JavaScript Memory Leak Fix: 6 Patterns + DevTools Walkthrough
Every memory leak tutorial tells you to open DevTools without giving you actual leaks to practice on. This guide has 6 live triggerable leaks built into the demo — open DevTools alongside and watch memory grow in real time. Covers the three-snapshot technique, queryObjects() DevTools trick, observer-disconnect (ResizeObserver / IntersectionObserver), AbortController unified cleanup, performance.measureUserAgentSpecificMemory() for production, React useEffect cleanup, WeakMap/WeakRef + FinalizationRegistry caveats, and real KB-per-minute growth numbers.
JavaScript
23 min
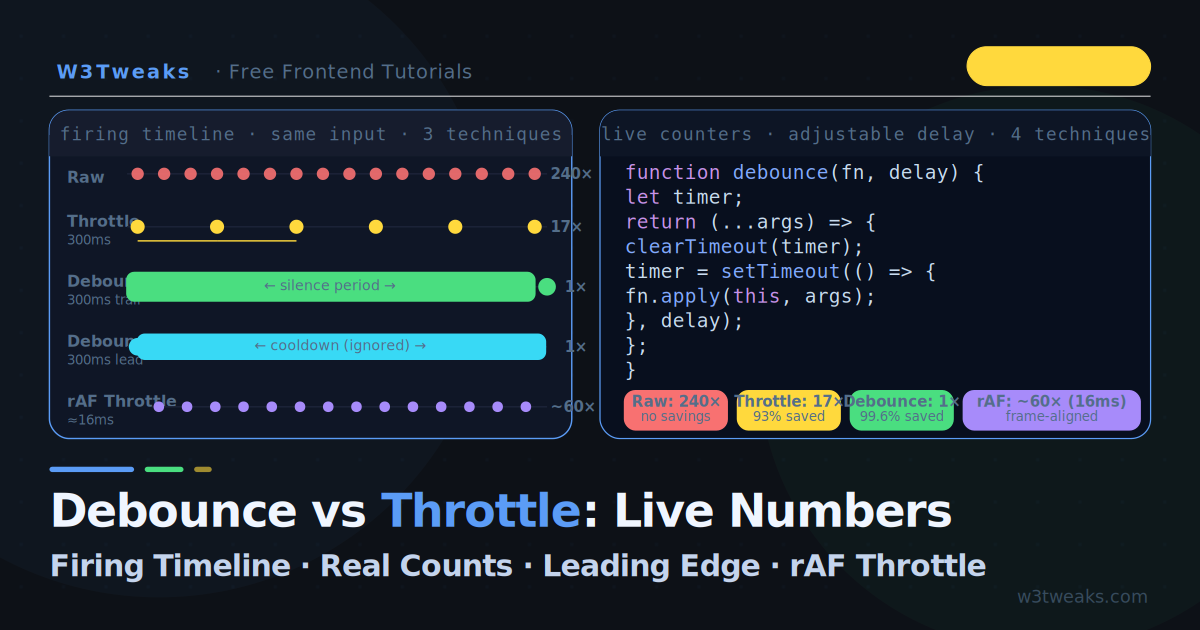
JavaScript Debounce vs Throttle: Real Difference With Live Numbers
Every debounce vs throttle article says 'throttle fires 30-50 times, debounce fires once' — but nobody shows it happening live. This tutorial has a firing-timeline visualiser that tracks every call with real millisecond timestamps, plus the leading edge pattern nobody explains, the rAF throttle nobody covers, the AbortController + debounce fetch pattern, React 18 useDeferredValue comparison, TypeScript signatures, and the wrong-tool bugs nobody demonstrates.
JavaScript
23 min
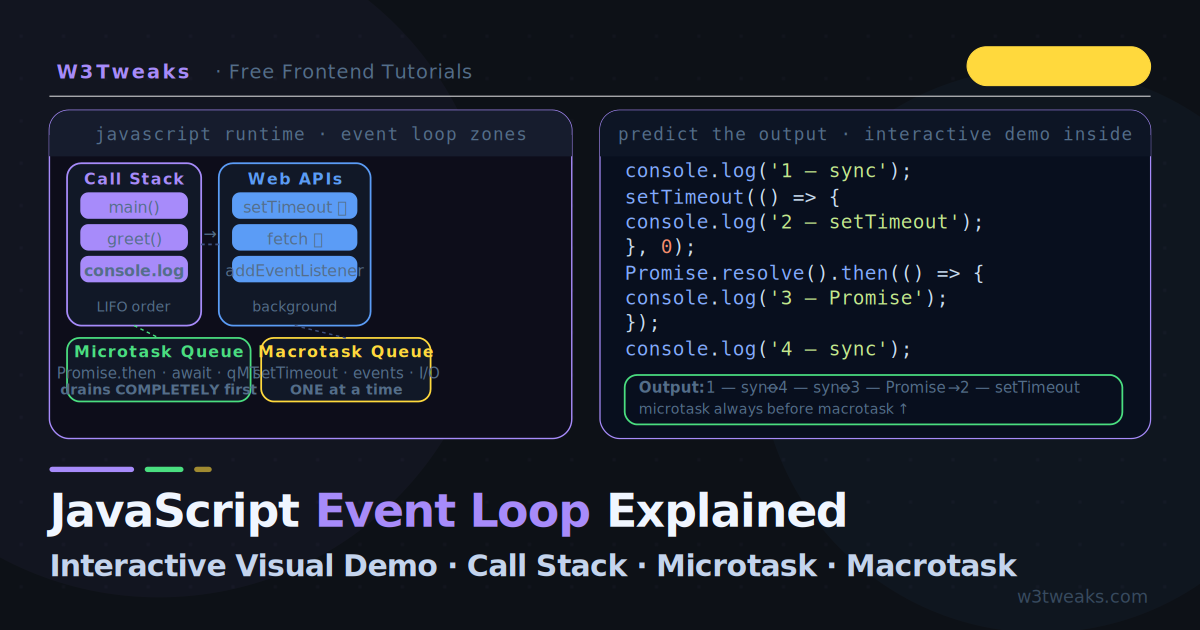
JavaScript Event Loop Explained — Visual Interactive Demo
The JavaScript event loop is the engine behind every setTimeout, Promise, and async/await call you write. This guide is an interactive event loop visualizer — five step-by-step scenarios where you watch the call stack, microtask queue, and macrotask queue update in real time. Covers browser AND Node.js event loop phases, process.nextTick vs setImmediate, the scheduler.yield() API for INP optimization, and the MessageChannel trick React uses.